
Non-branded Traffic is search engine traffic your website receives from keywords that never mention your brand name. These keywords are how people discover your website online, they are vital to a website’s success as they are often worth more than the brand itself.
We’re going to pretend we’re looking to filter non-branded keywords for a made-up company called Raspberry Dance Shoes.
In our example brand “Raspberry Dance Shoes”, whenever a search term contains the word “Raspberry“, we can safely say that the searcher knows about the brand. A few examples of branded keywords would be:
- “Raspberry’s dance shoes”
- “dance shoes from Raspberry”
- “black dancing plimsolls from Raspberry UK”
- etc.
What can be really useful is monitoring keywords that attract visitors but don’t contain the brand name such as these few examples:
- “dance shoes”
- “dancing shoes”
- “shoes for dancing in”
- “white dancing plimsolls”
- “thin ladies shoes”
- etc.
Not Provided Keyword Data
Unfortunately during October 2011, Google started to block some of the organic keyword data for privacy and security reasons which means that you can only see a limited amount of data on organic keywords. The amount of hidden organic keyword data has risen from 3% to a whopping 80% on average in early 2014, some of our clients now have as much as 85% hidden data now in April 2014 and it may rise still in the near future:

In Analytics any search keyword hidden by Google will be labelled with the name “(not provided)” so we need to bare that in mind when looking for non-branded keywords as many of them will be lumped into this non-specific group along with branded keywords.
Setting Up a Non-branded Organic Traffic Report
Firstly navigate to Google Analytics: http://www.google.com/analytics
If you haven’t setup Google Analytics then you will have to install the tracking code on your website and wait a day or so for the visitor data to arrive
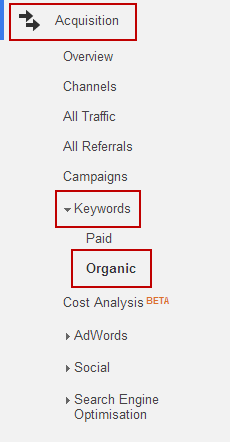
Select the correct property in Google Analytics and then navigate to Acquisition > Keywords > Organic:
The main window within Google Analytics will then become populated with the keywords people have used to find your website and the number of visits you received from each keyword:
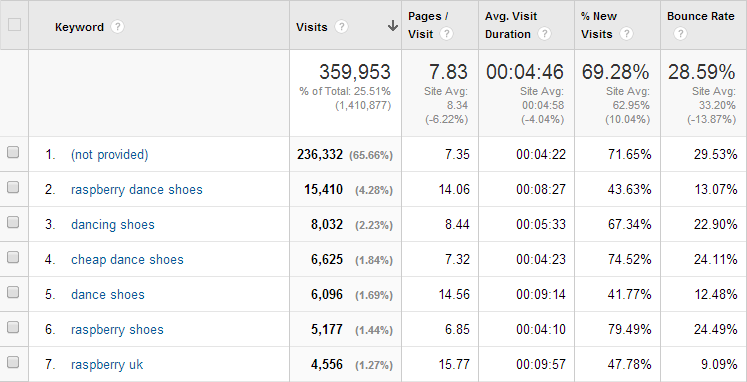
You will likely notice that a significant number of these top keywords contain your business name, a variation of your company name or a common misspelling of your name.
In this example we’d like to exclude all of these instances of business name in order that we can be left with a clean list of unbranded keywords that people have used to find your products or services. You will also notice the huge number of “(not provided)” keywords in this report mentioned earlier.
We’re now going to create an “Advanced Filter” that will separate out these branded keywords from the non-branded keywords, select “Advanced” from the menu bar as pictured below to bring it up:
![]()
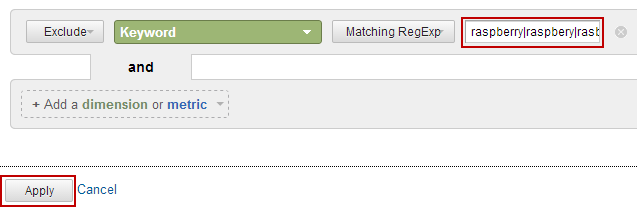
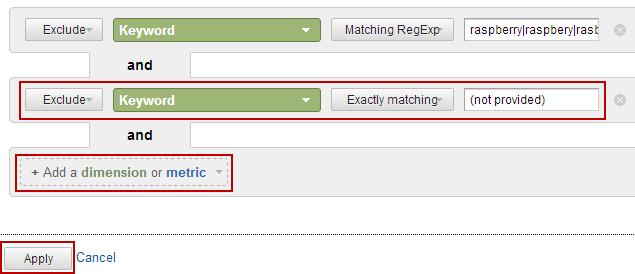
In the first drop-down box select “Exclude”, in the second box “Keyword” should be highlighted and in the third box select “Matching RegExp”:

In the next box I would like you to enter your company name along with any popular misspellings people use. If we have a business called “Raspberry Dance Shoes” that sells dance shoes, we would be looking to exclude keywords containing the word “raspberry”.
Each phrase is separated by a pipe character shown here (which represents the regular expression code for an OR operand): |
The pipe character is created by holding the Shift key and then simultaneously pressing the Backwards Slash key on your keyboard.
In our example, the filtered keywords might look like: raspberry|raspbery|rasberry —These represent the different ways people spell the branded portion of the name, we certainly wouldn’t want to filter keywords containing the word “shoes” or anything which is not brand specific!
Let’s look at some example brand name filters for some well known brands:
An example of a popular high street shop might look like: whsmiths|smiths|whsmths
An example of a popular fast food restaurant would be: mcdonalds|macdonalds|maccy|mcd|donalds
An example of a popular social network would be: twitter|twiter|tiwtter|tweeter|twtter
For ourselves (“Hallam”) we would exclude just the word “hallam” and never the word “internet” in the filter. The word “internet” may represent one of our “Internet Marketing Service” type keywords which are non-branded keywords even though they mention the word “Internet” which is contained within our business name.
A plumber named “ABC plumbers” for example would not filter out the word “plumber” but just the acronym “ABC” which is brand specific.
Enter your branded terms separated by the pipe symbol |:
This will now filter your list removing all instances of your brand name, giving you a much more accurate view of the phrases your website is both optimised for and successfully bringing in traffic. The keywords or phrases with the greater number of visits are likely to be appearing much higher in the Google search results.
If you want to neaten up the results by removing the “(not provided)” keyword then add another filter to exclude the keyword exactly shown below and remember to “Apply” the changes:
Setting up a custom dashboard
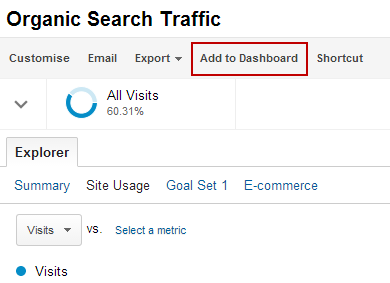
You can now add this information to your main dashboard as a report widget, so you can review your non-branded terms each time without having to repeat the steps above!
Click the “Add to Dashboard” button:
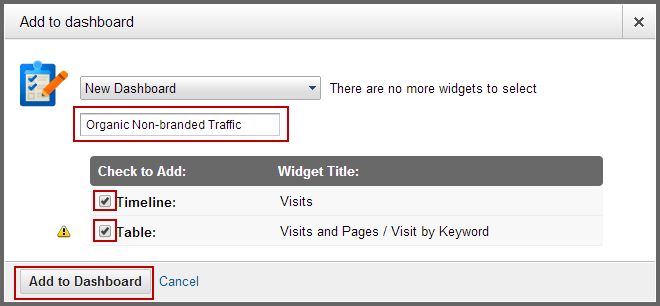
Select “New Dashboard” from the drop-down list and check both boxes to display “Timeline” and “Table” views:
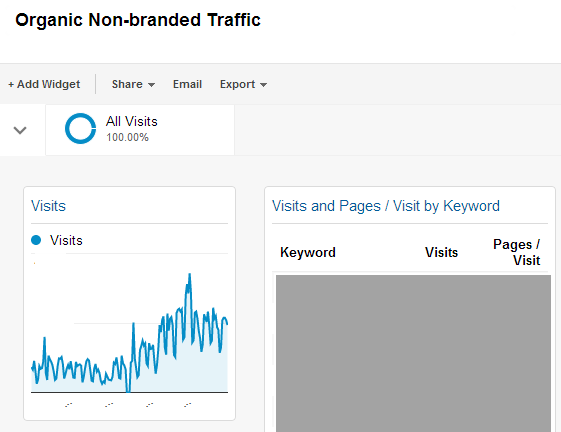
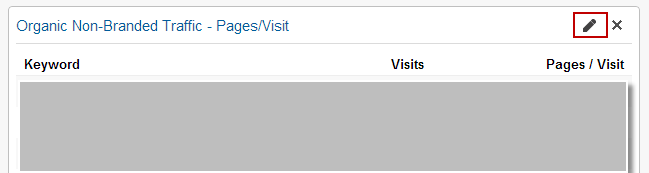
By default this will display as “Visits” and “Keyword” at the top of your dashboard (we have hidden the keyword data in the screenshot below by the way):
By clicking on the pencil icon in the top right corner it is possible to name these reports so we can better understand what the information is showing us or show different metrics such as:
- keyword visits vs. revenue
- keyword visits vs. bounce rate
- keyword visits vs. goal completions
- etc.
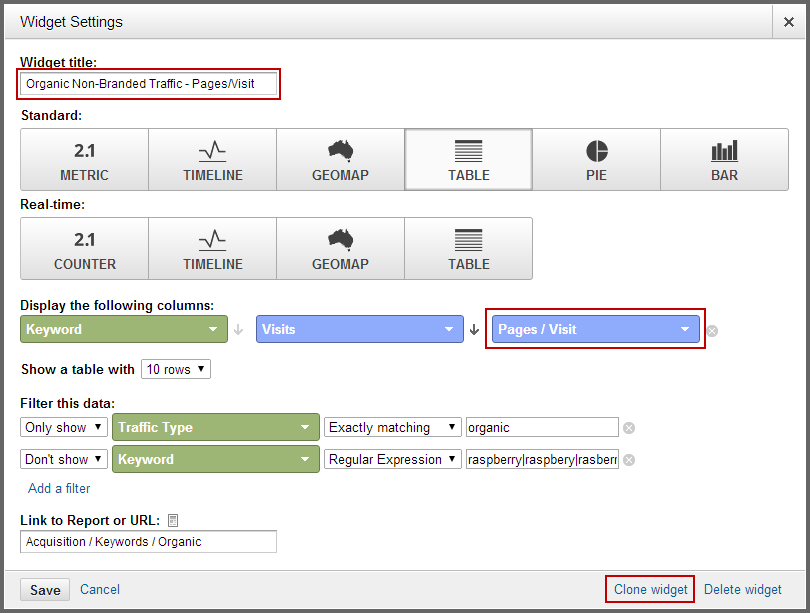
You can show multiple “widgets” on the dashboard easily by cloning the first widget and then changing what metrics are shown with the correct filters in place (shown in the screenshot above). This way you can make a custom dashboard that has every bit of information you need in one place.
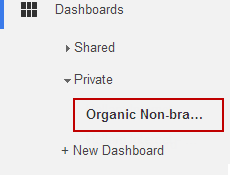
To find custom dashboards in the future on Google Analytics visit at the top: Dashboards > Private > [Name of your Dashboard]:
Conclusion
Armed with this tool, you’ll now be able to make quicker decisions based around the existing keywords that are bringing traffic to your website without the numbers and graphs being distorted by people searching for your brand or company name.
Optimising for your top-performing or most popular non-branded keywords can account for the quickest improvements you can make towards a website for SEO. You can also see which non-branded keywords are making the most leads/sales and then use this data towards pay-per-click advertising or improve average conversion rates with split testing on the relevant landing page.