Dynamic ads are feed-based ads (similar to Google AdWords dynamic display ads) that serve up a retailer’s offering on a Facebook user’s feed. They can be targeted to specific audiences based on actions they’ve taken on the retailer’s website, such as viewing a product page, or adding items to a cart.
Dynamic product ads look identical to other single or multi-image ads that are available on Facebook and appear in the news feed and the right column. However, whereas previously you needed to manually create ads for each product, or set of products, Facebook’s dynamic ads makes life much easier as you just need to create the ad template, then Facebook with personalise the ad for each shopper by filtering in the relevant products.

This post outlines the basic process for setting up dynamic product ads on Facebook in three steps:
- Upload your product catalogue to the Facebook Business Manager – a structured data file containing information about each product e.g. name, description, image, price, SKU, etc.
- Change or upload your Custom Audience Pixel (code which is added to your website) which tracks custom data events reporting which products are viewed, added to a cart, or purchased.
- Set up a dynamic product ads template and configure your campaign.
Create and Upload a Product Catalogue/Feed
If you’ve used Google Merchant Centre/Google Shopping, you will be familiar with product feeds. These are essentially files which contain all the required information about your products. When you log into Facebook Adverts Manager and click new campaign, you will see that one of the marketing objective options is to “Promote a product catalogue”:
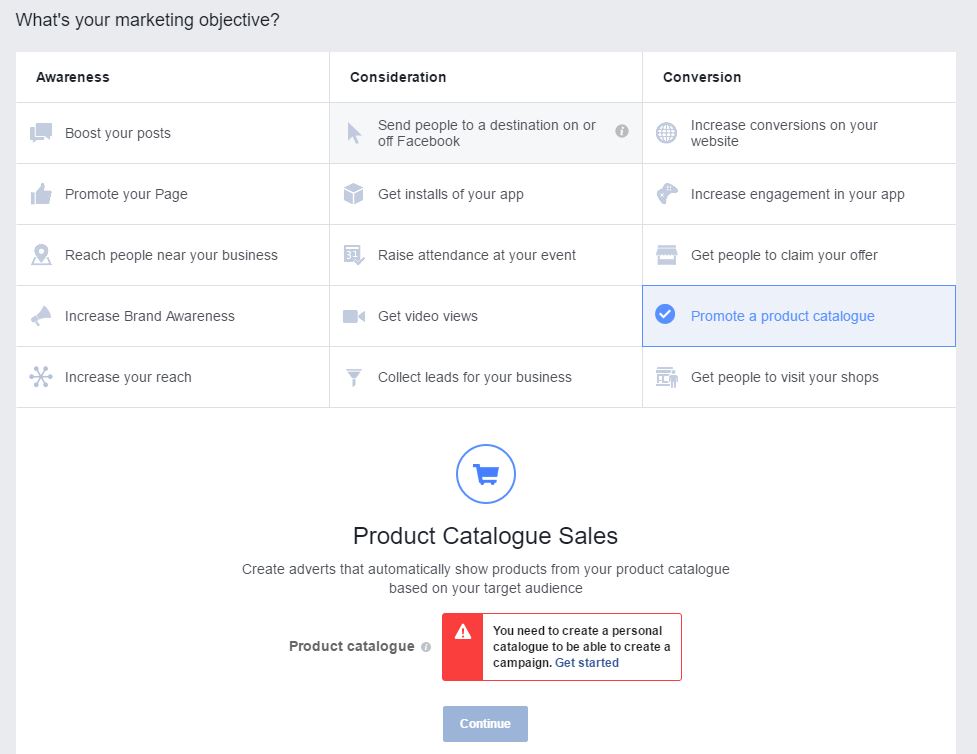
Clicking on this will indicate that you need to create a catalogue and once you click the Get Started link you will be guided through the process.
From the catalogue set up page, you will click to add a product feed, and then follow the steps below:
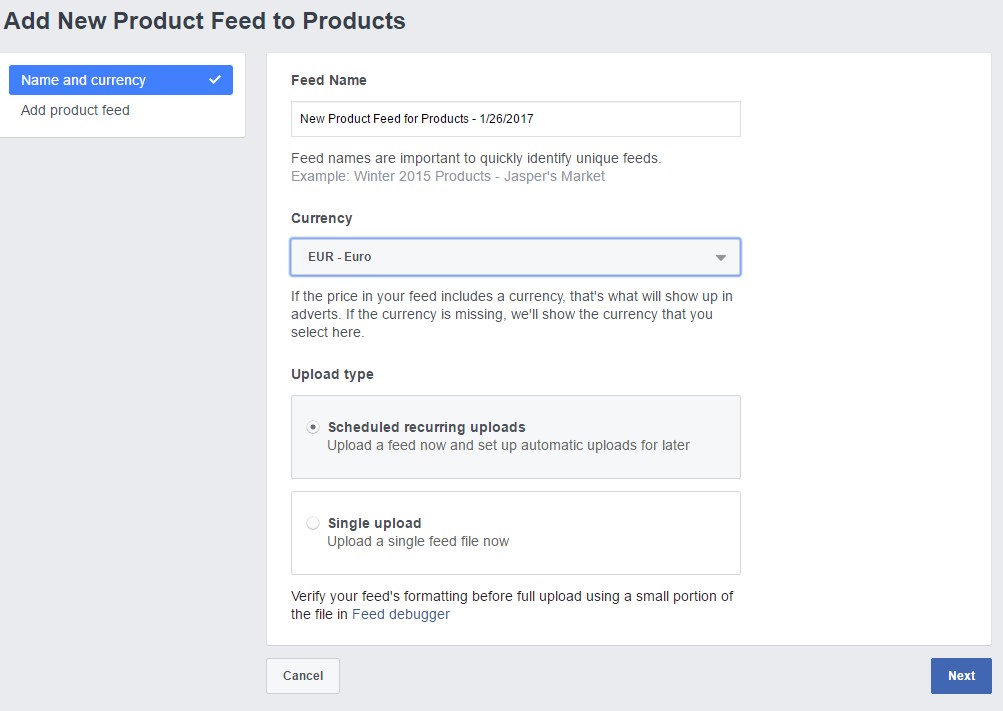
At this point, you will need to choose an upload type. You can either schedule uploads using a feed that is hosted on your website, or upload a local file which you will then need to manually keep updated. Using the former option is usually advisable as it ensures your product data is regularly updated.
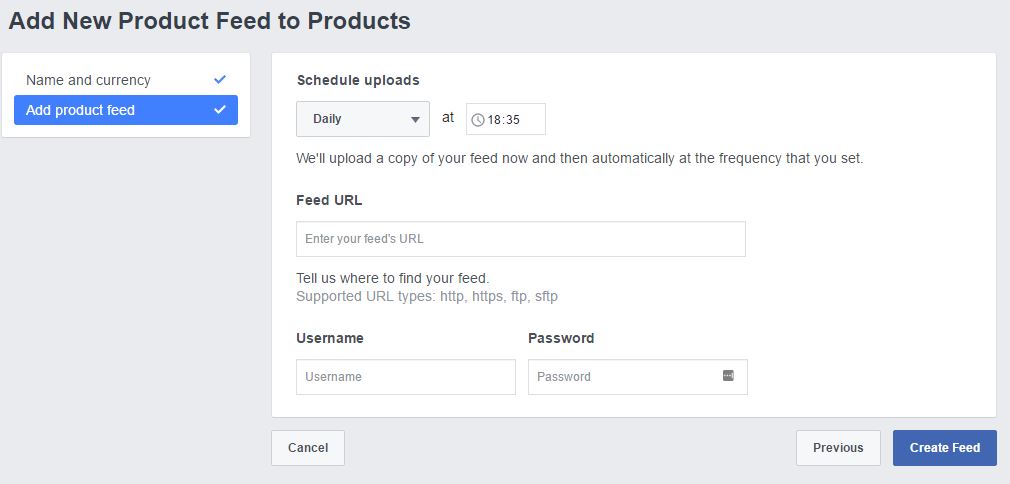
You will then be taken to a screen where you will tell Facebook where to find the feed, and how often they should fetch the feed. Retailers can auto-upload the feed with a URL or they can send it via FTP (file transfer protocol). If you send it via FTP you will add in the host URL, as well as the login details to access that feed.
Create Facebook Pixel + Add To Your Site
To run dynamic product ads, you need to add both the basic Facebook Pixel to your site, as well as add a custom code in order to track the three standard events that are required:
- When a visitor views a product detail page
- When a visitor adds a product into the shopping cart
- When a visitor confirms and finishes the payment for a purchase
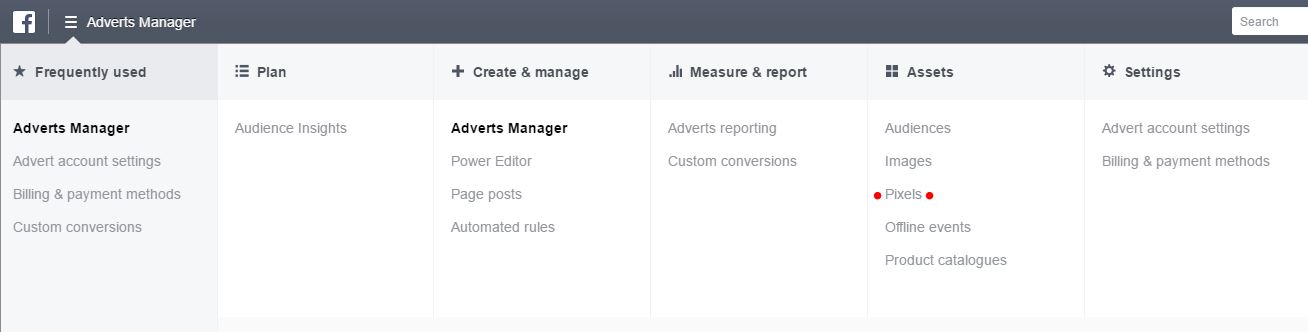
Facebook helpfully guides you through this process from the Install Pixel page, which you can navigate to in all tools:
Facebook also provides instructions for installing the code via integration with your CMS or via Google Tag Manager:
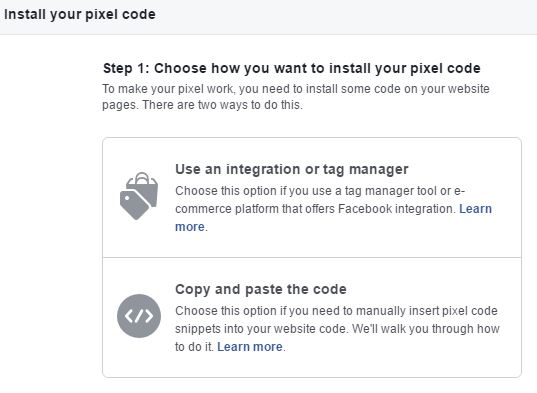
If you choose to manually insert the pixel, you will need to add the base code to the header of your website. Then you need to add the custom event code from the Advanced section to track the events required for Dynamic Ads, on the specific pages where the actions will take place:

Where you add the custom event code will depend on how the action takes place on your website. You can paste it on page load, where the user is taken to an order confirmation page after buying a product for example. Or, if the user is not taken to a new page, the event should instead be sent when the inline action happens, for example when the user clicks a “submit order” button. In the former case, the code should be added between the script tags below the head tag. In the latter case, the code should be added to the button.
Verify Pixel
Once you’ve created your pixel, you can see its status. Until you’ve had a conversion, the status will be shown as unverified. Your pixel must be installed properly and record a conversion event to become verified, so that you can begin using it.
In order to verify that the Facebook Pixel is installed properly, Mitchell Freeland, Technology Specialist at CPC Strategy, recommends installing the Facebook Pixel Helper Chrome Extension.
Set Up Your Dynamic Product Ads and Configure Your Campaign
Next, you can customise the messages for each product. The dynamic ad templates enable you to map data fields from the product catalogue to specific locations in the Facebook ad. Basically, you are taking data from your feed and placing it in the ad – and these locations are the ad message, the name/title of the ad, and the description: For example:
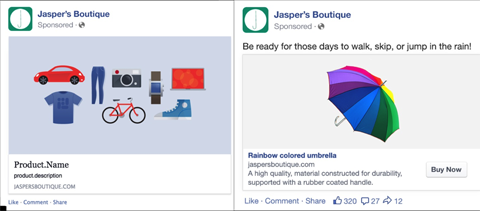
Remember, you can use each of those template items in the message, name and title of the ad, so you’ll want to A/B test different ideas to see what performs best across your ad set.
Advantages of Dynamic Product Ads
The benefits of using Facebook dynamic product ads include:
- Time-saving – They are more efficient for the advertiser in terms of creating ads, campaign management and configuration (once the initial set up has been completed) – there’s no need to create multiple ads for every product/product line.
- Relevance – They allow super up-to-date promotion of products that are highly relevant to your potential customers, who have already browsed your product on your website.
- Cross-device – Facebook allows you to target users across all of their devices without relying on cookies.
- Effective – With so many ways to control target audience filtering, dynamic product ads on Facebook show the right products to the right users which improves ad effectiveness. This can increase conversions by reducing abandoned shopping carts and promoting reorders and the sale of related products.