Merchant promotions enable advertisers to make their Google Shopping Ads stand out from the competition. Using promotions helps to increase click through rates, conversion rates and can potentially also lower the cost per acquisition.
This post explains the different steps required to setup and use Google Merchant Promotions.
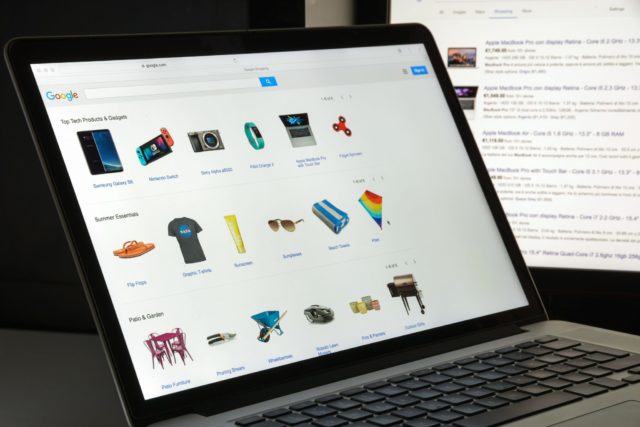
What Do Merchant Promotions Look Like and When Do They Appear?
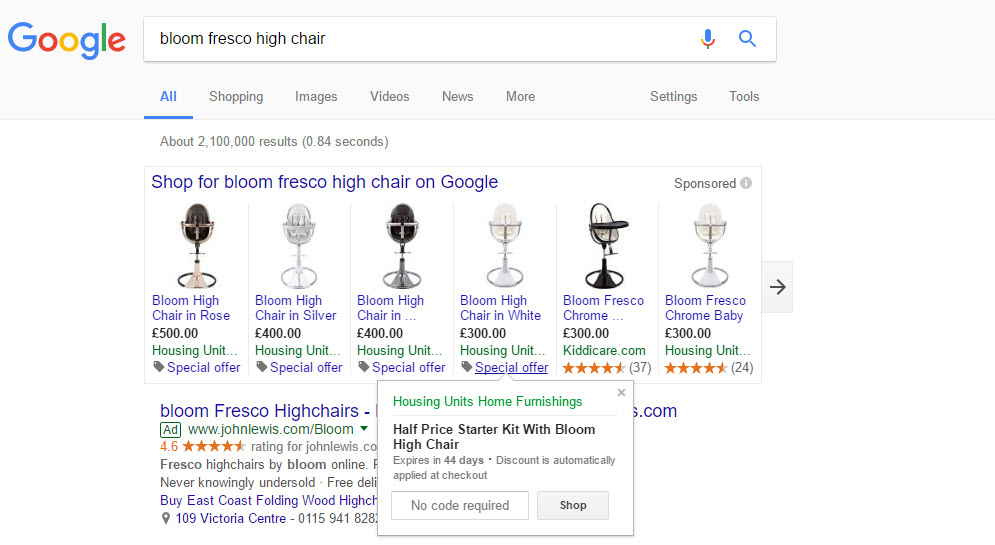
Promotions appear on the first page of the paid search results when the shopping carousel adverts trigger.
Initially you will see the phrase Special Offer underneath the product listing ad. When you click on this text the offer details expand out and you can see a but kore about the offer in question.
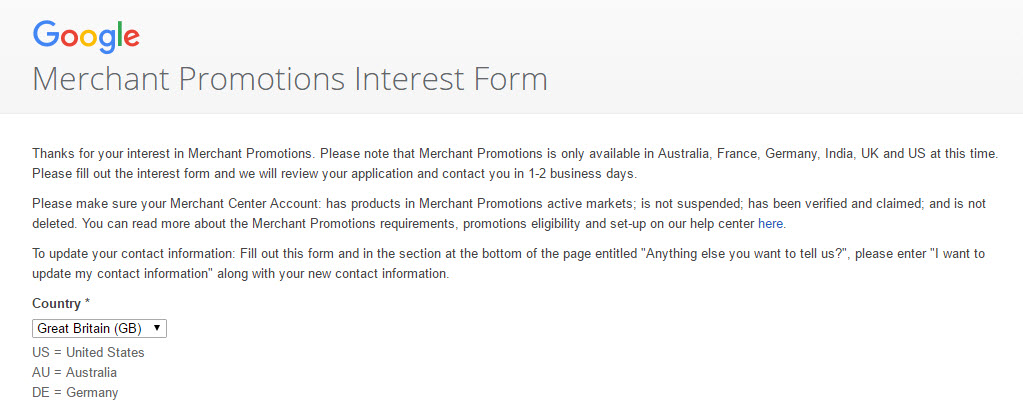
Step 1: Complete the Google Merchant Promotions Interest Form
Before you can setup a promotion you first need to have setup a merchant centre shopping feed. If you haven’t done this already they why not take a look at our guide to setting up and using Google Shopping? If you’ve already setup a shopping feed that the next setup is to complete the Google Merchant Promotions Interest Form to get your account white listed for Google’s promotions feature. Google should review you application within 2 days and then you should be able to get to work on setting up your promotions.
Step 2: Decide on What Promotions You Are Going to Create
Before we get ahead of ourselves and rush into the technical stuff, it is perhaps worth giving some thought to what types of promotions you would like to create. Some of the available promotion options include:
- Free postage or discounted postage. Postage discounts must be accompanied with a promotion code
- Percentage off offers. These must be applicable to all users and not limited to first time customers, user demographics or payment card types.
- Bundle offers. If combinations of products are required at basket it should be made clear what products need to be added.
- Product discount code offers. Increase conversion rates by enticing users with a time limited discount. Everyone loves an offer!
If you are already using promotions on different online channels it may be worth analysing the data to see which one’s are working well for you.
Step 3: Understand the Promotions Criteria
- Promotions should be limited to 6 months
- A promotion must be redeemable at checkout
- Product specific promotions should be mapped to specific products
- Promotions have to be manually approved by Google before they can go live. You can view the approval status within your Google Merchant Centre account
- Once a promotion is approved, the same promotion id can not be submitted again. The id reference has to be changed for each newly submitted promotion.
Step 4: Consider How Frequently You are Going to Create Promotions
There are two different options available to advertisers looking to setup and manage Google Merchant Promotions. The best option to choose depends on the number of promotions you are going to create and how often you are going to update them and whether you want the promotion submission process to be automated.
If you are planning to create multiple promotions regularly then it is advisable to go for the automated option and create a Google Shopping Merchant Promotions Feed. Using a Promotions feed will allow you to automatically submit promotions to Google Merchant Centre.
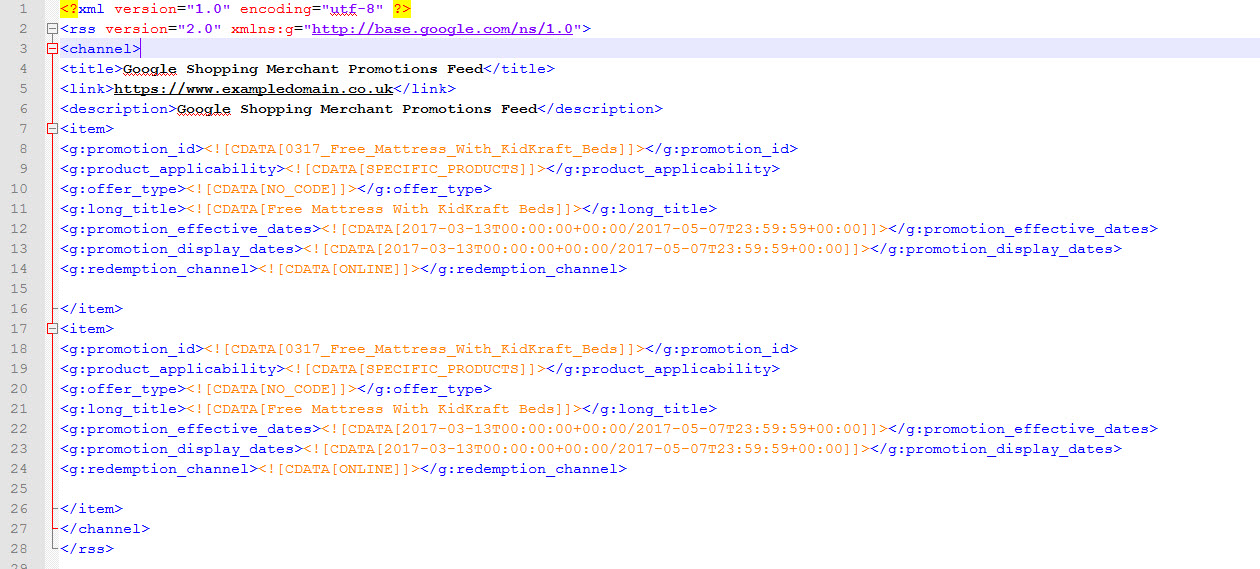
Promotion feed formats can be created in XML (show below) in tab delimited format (eg csv) or using a Google Spreadsheet.
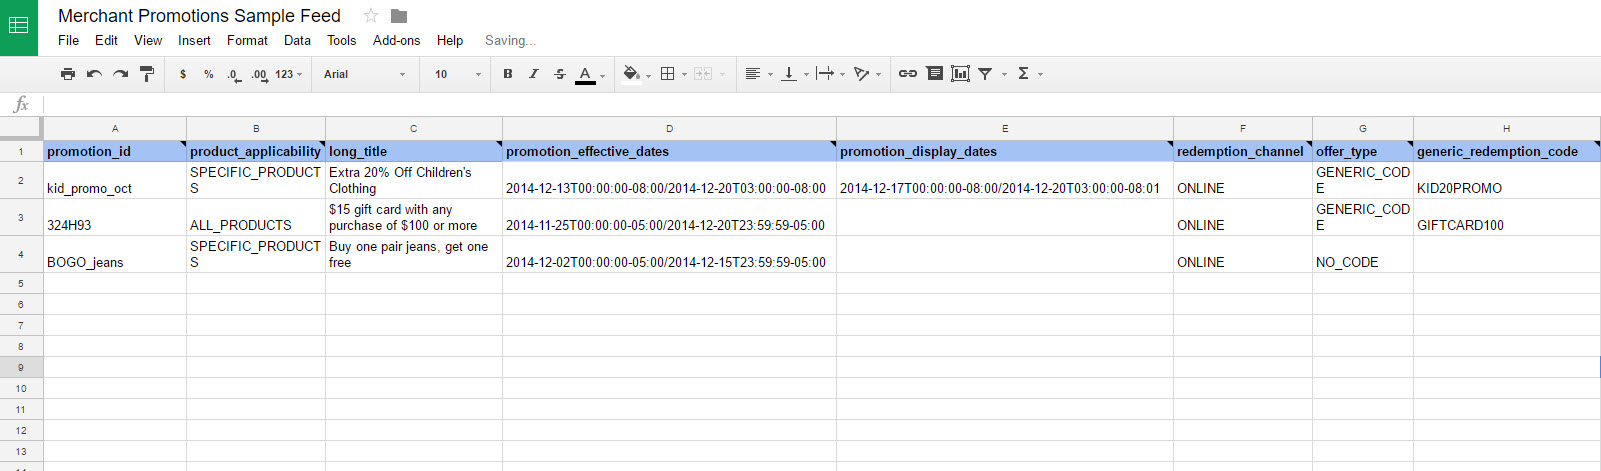
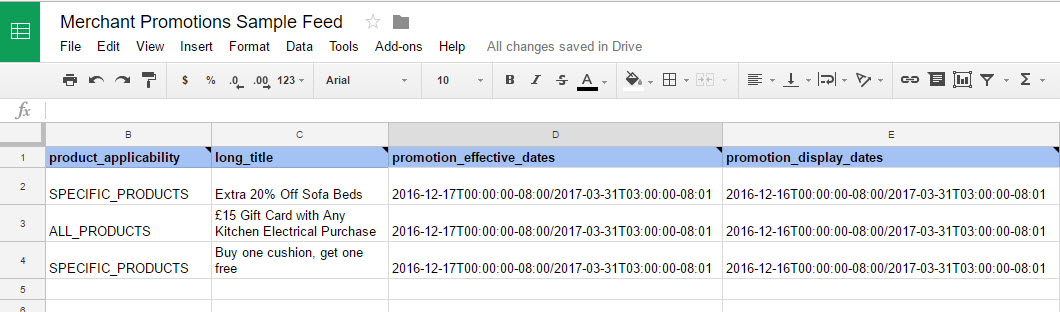
The screenshot below shows a Google Spreadsheet Feed.
If your not going to run many promotions then you can submit them one by one within Google Merchant Centre using the plus promotions tool.
All of the different options require you to enter the same data attributes.
Step 5: Create the Promotions Data Attributes
Each promotion that you create regardless of the method that you add it needs to include specific promotion attributes and these are listed below.
- Required Fields
- promotion_id
- product_applicability
- offer_type
- long_title
- promotion_effective_dates
- redemption_channel
- Optional fields
- promotion_display_dates
- minimum_purchase_amount
- generic_redemption_code
An explanation of each different attribute is include below. The code shown in the arrow brackets is the XML tag required if setting up an XML merchant promotions feed.
Promotion_id <g:promotion_id>
This is the unique promotion id for your promotion. Each product promotion must have a unique id as highlighted in bold in the example xml feed code below.
<g:promotion_id><![CDATA[0317_Free_Mattress_With_KidKraft_Beds]]></g:promotion_id>
A product can have multiple promotion_id values assigned to it if more than one promotion can apply to the product.
Product_applicability <g:product_applicability>
Product applicability is used to indicate whether the promotion applies to specific products (code is [specific_products]) or all products (code is [all_products]).
<g:product_applicability><![CDATA[SPECIFIC_PRODUCTS]]></g:product_applicability>
Offer Type <g:offer_type>
The offer type is used to specify whether the offer requires a code ([GENERIC_CODE]) or no code ([NO_CODE]).
<g:offer_type><![CDATA[NO_CODE]]></g:offer_type>
Long_Title <g:long_title>
The long title is the text that appears on Google next to your product when the promotion triggers.
<g:long_title><![CDATA[Free Mattress With KidKraft Beds]]></g:long_title>
Promotion_Effective_Dates <g:promotion_effective_dates>
The dates when the promotion starts and ends
<g:promotion_effective_dates><![CDATA[2017-03-13T00:00:00+00:00/2017-05-07T23:59:59+00:00]]></g:promotion_effective_dates>
Promotion_Display_Dates <g:promotion_display_dates>
By setting the promotion_effective_dates earlier than the promotion_display_dates, the promotion can be reviewed for validity prior to the date that the promotion will be displayed, which allows Google to complete all review checks in advance.
<g:promotion_display_dates><![CDATA[2017-03-13T00:00:00+00:00/2017-05-07T23:59:59+00:00]]></g:promotion_display_dates>
Redemption_Channel <g:redemption_channel>
The redemption channel for the promotion which should be set to online.
<g:redemption_channel><![CDATA[ONLINE]]></g:redemption_channel>
Minimum_purchase_amount <g:minimum_purchase_amount>
The minimum purchase amount attribute can be used to set the minimum purchase value required before the promotion becomes valid. If the promotion doesn’t have a minimum value then this isn’t required. This attribute only applies if you are advertising in the US, Australia or India
<g:redemption_channel><![CDATA[20 USD]]></g:redemption_channel>
generic_redemption_code <g:generic_redemption_code>
The generic redemption field should contain the offer code if the offer is based on using an offer code. The offer type field should be set to GENERIC_CODE
<g:generic_redemption_code><![CDATA[EXTRA15]]></g:generic_redemption_code>
6. Create Your Merchant Promotions Feed or Add Them Manually
Creating an XML Merchant Promotions Feed
A promotions feed can be created in Google Sheets, tab delimited (eg .txt or .csv) format. If you have already setup your Google Shopping Feed it makes sense to setup your Promotions Feed in the same file format.
To create a feed in Google Sheets format click you are welcome to make a copy of out Merchant Promotion Feed Example Google Sheets document.
For XML feeds please feel free to use the code below and change the attribute values highlighted in bold to match the attributes in your website database.
<?xml version=”1.0″ encoding=”utf-8″ ?>
<rss version=”2.0″ >
<channel>
<title>Google Shopping Merchant Promotions Feed</title>
<link>https://www.exampledomain.co.uk</link>
<description>Google Shopping Merchant Promotions Feed</description>
<item>
<g:promotion_id>{promotion_id}</g:promotion_id>
<g:product_applicability>{product_applicability}</g:product_applicability>
<g:offer_type>{offer_code}</g:offer_type>
<g:long_title>{special_offer}</g:long_title>
<g:promotion_effective_dates>{effective_dates}</g:promotion_effective_dates>
<g:promotion_display_dates>{display_dates}</g:promotion_display_dates>
<g:redemption_channel>ONLINE</g:redemption_channel>
</item>
</channel>
</rss>
In addition to creating the feed, you will need to add the promotion_id attribute to your Google Shopping Feed to map the products to the product specific promotions.
<g:promotion_id>{promotion_id}</g:promotion_id>
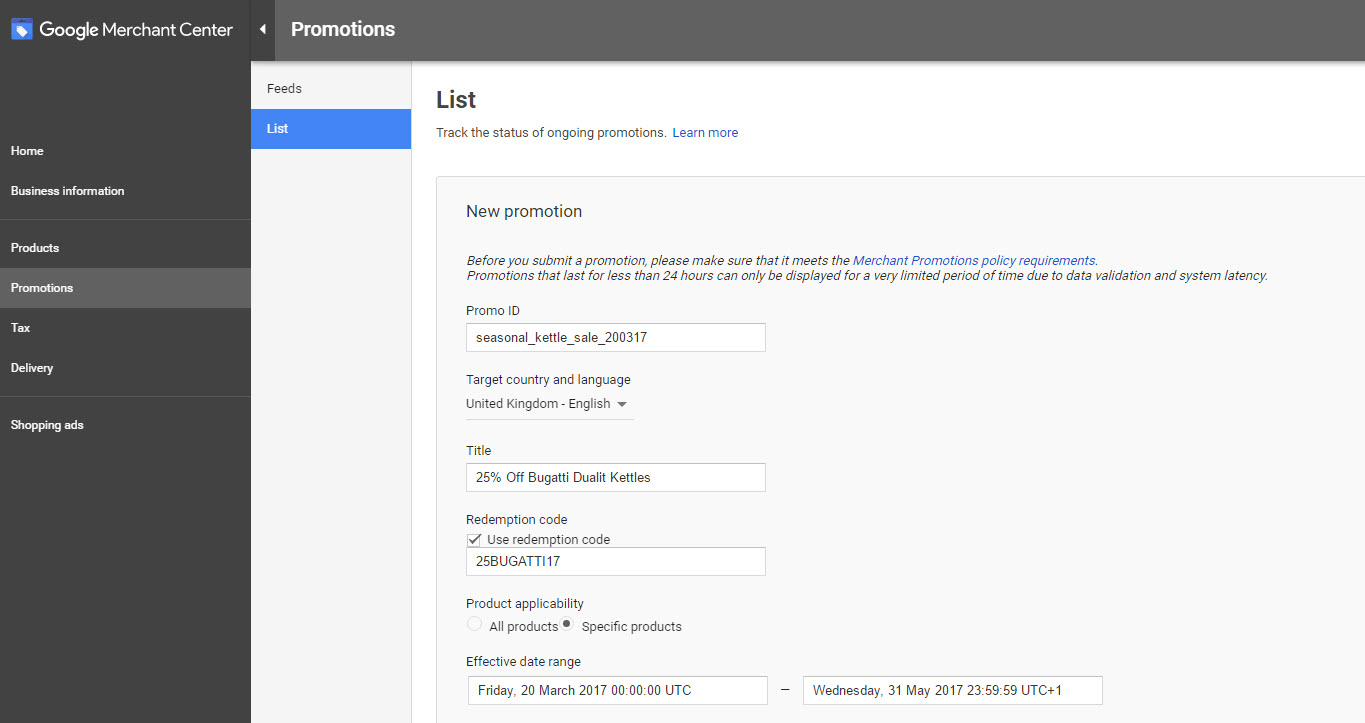
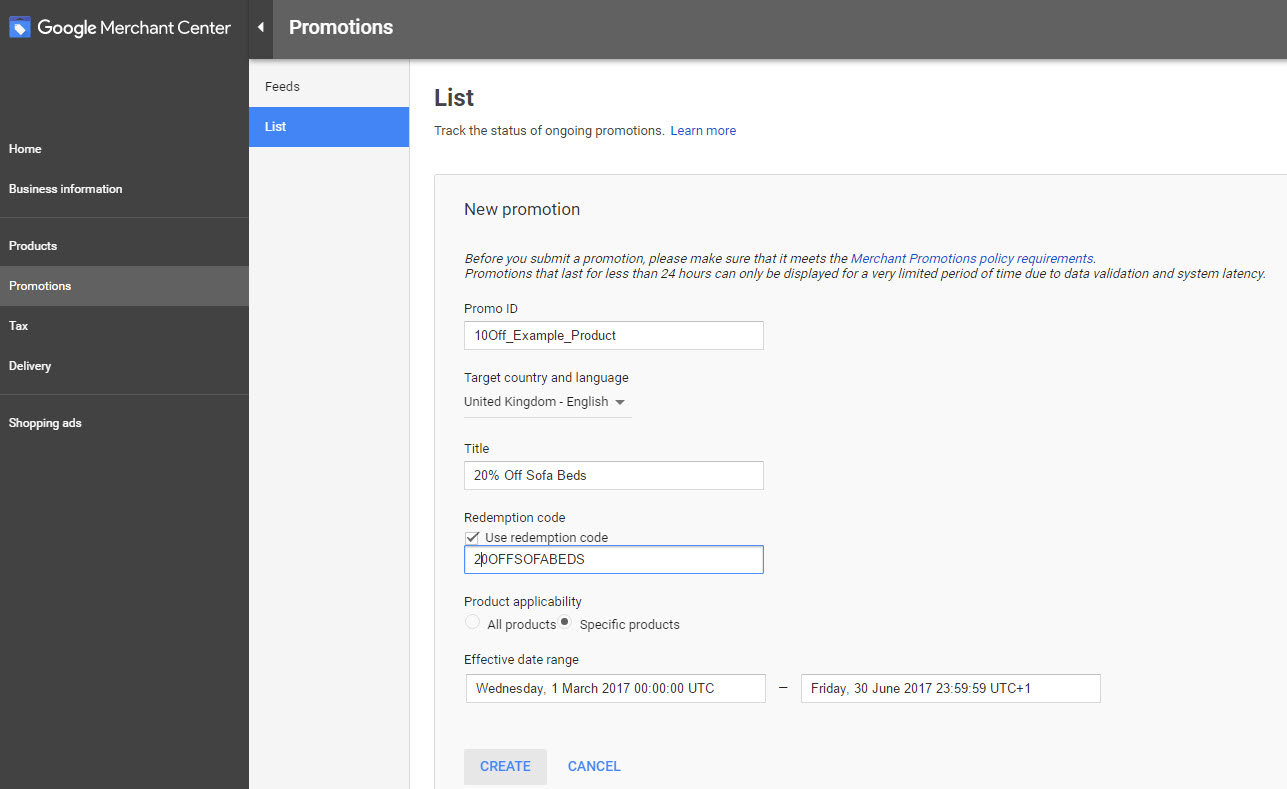
Adding a Promotion Within Google Merchant Center
To add a promotion within Google Merchant Center, go to the Promotions section and then click on List followed by the blue circle containing a + symbol.
Complete the attributes for the promotion and then click create.
7. Submit Your Promotions in Google Merchant Center
If you have created your promotions using the Promotions feature within Google Merchant Center they will have already been submitted for approval.
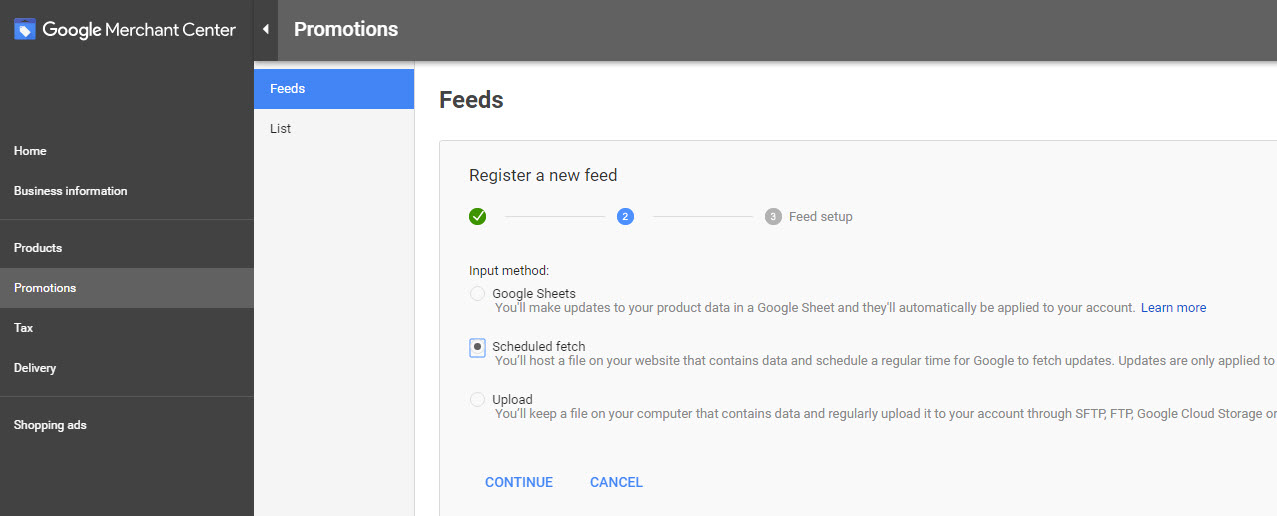
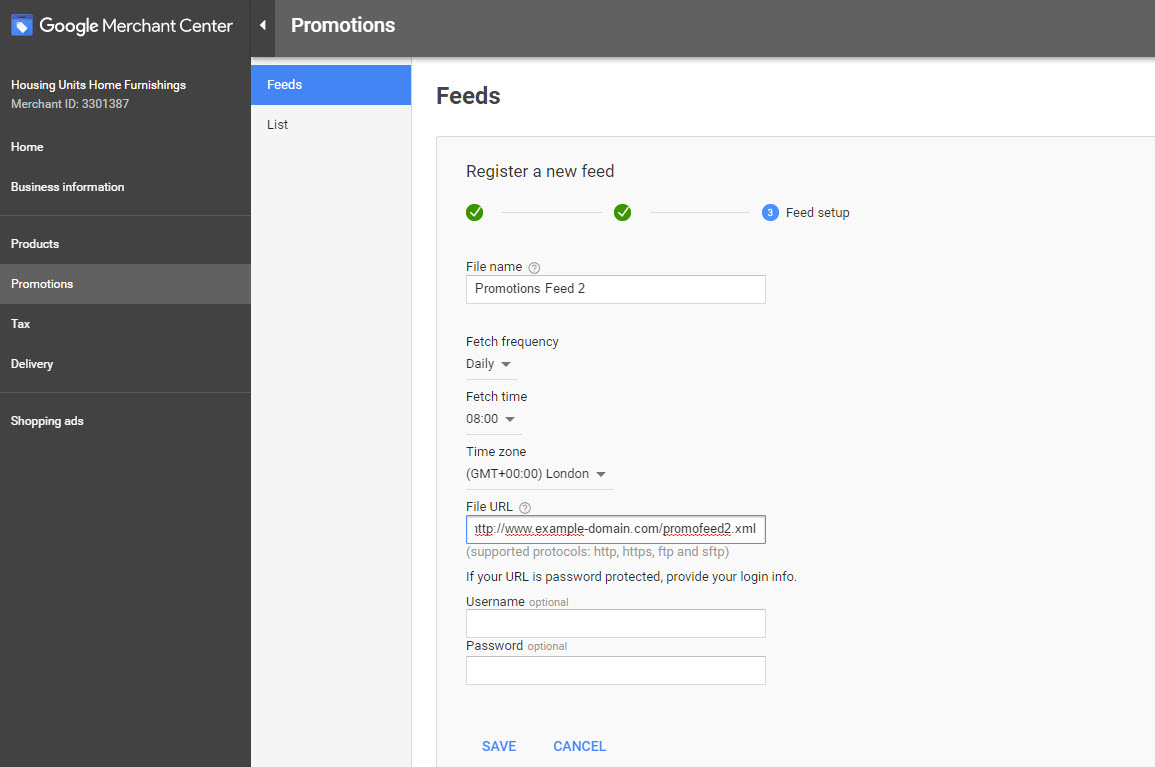
If you are using a promotions feed then you simply need to go to the Promotions section and click Feeds and add a new feed.
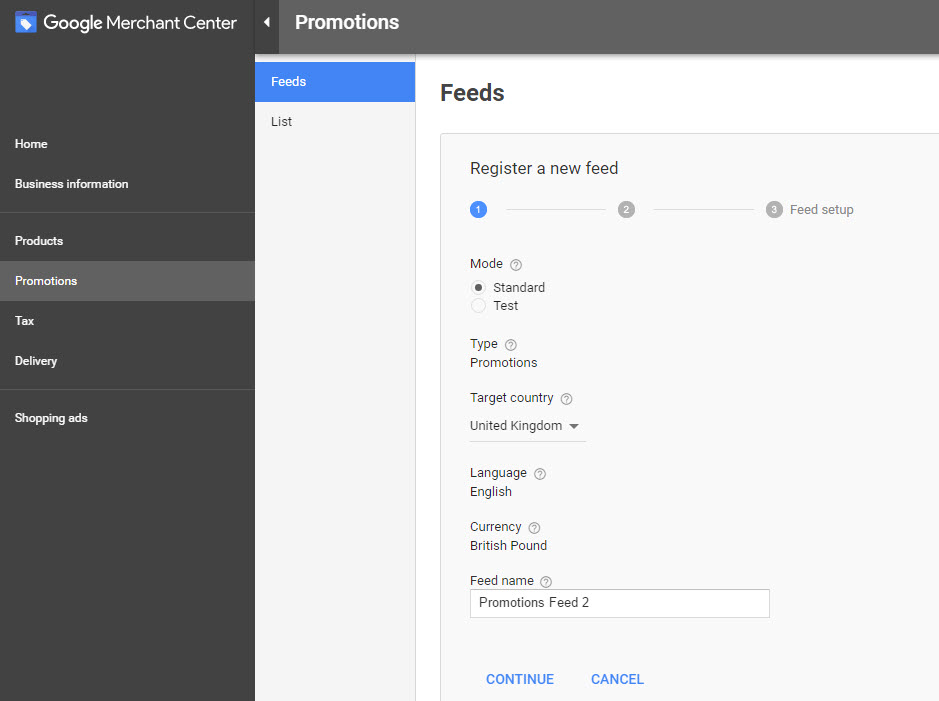
Decide on how you feed will be upload to Google Merchant Center. I recommend Google Sheets or Scheduled Fetch methods as this will prevent you from forgetting to upload your feed.
Give the feed a name and decide when you want it to be fetched. The Feed URL will need to match the address on your site where the xml feed is located or the address of your Google Sheet.
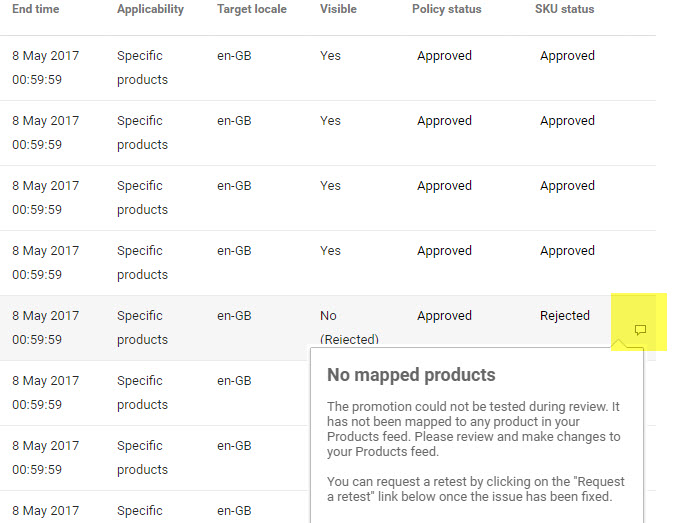
8. Review Your Promotions Approval Status
Once you have submitted your promotions you will need to check whether they have been approved. To do this go to the Promotions and then List page within Merchant Center. The status of each promotion will be listed.
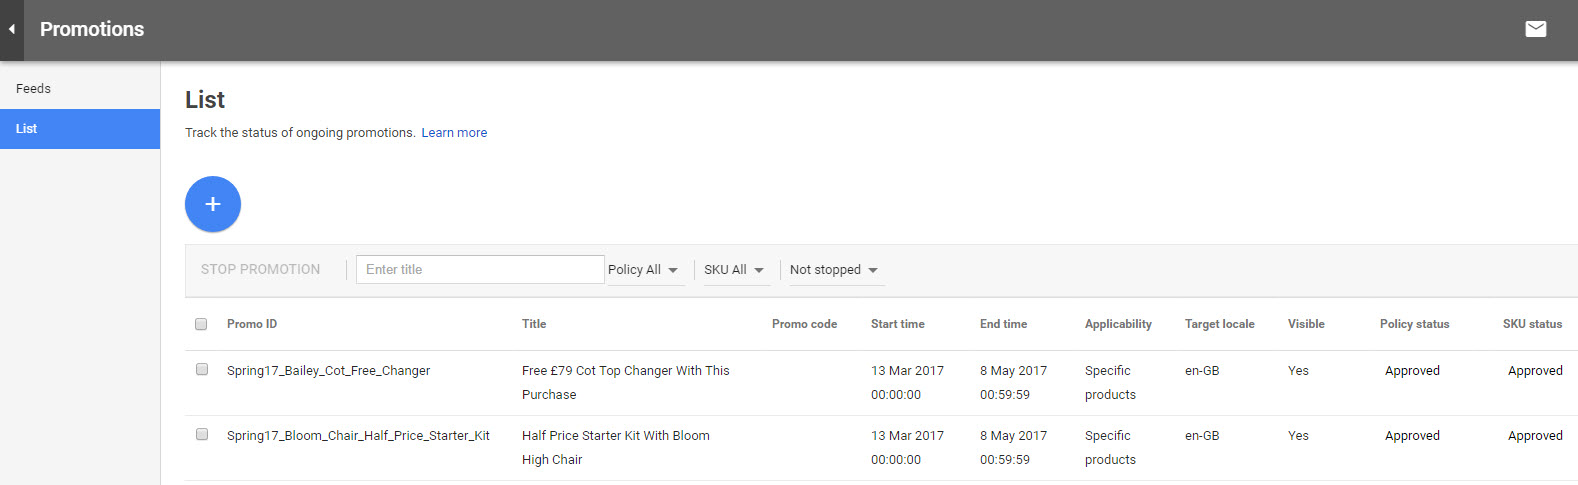
If a promotion has been rejected then you can click on the speech bubble to check why it has been rejected.
Conclusion
Setting up Merchant Promotions is certainly worthwhile and relatively straightforward, particularly if you only have a few promotions to add or have experience in setting Google Shopping Feeds. Way not let us know how you’ve got on with your promotions in the comments section below?