
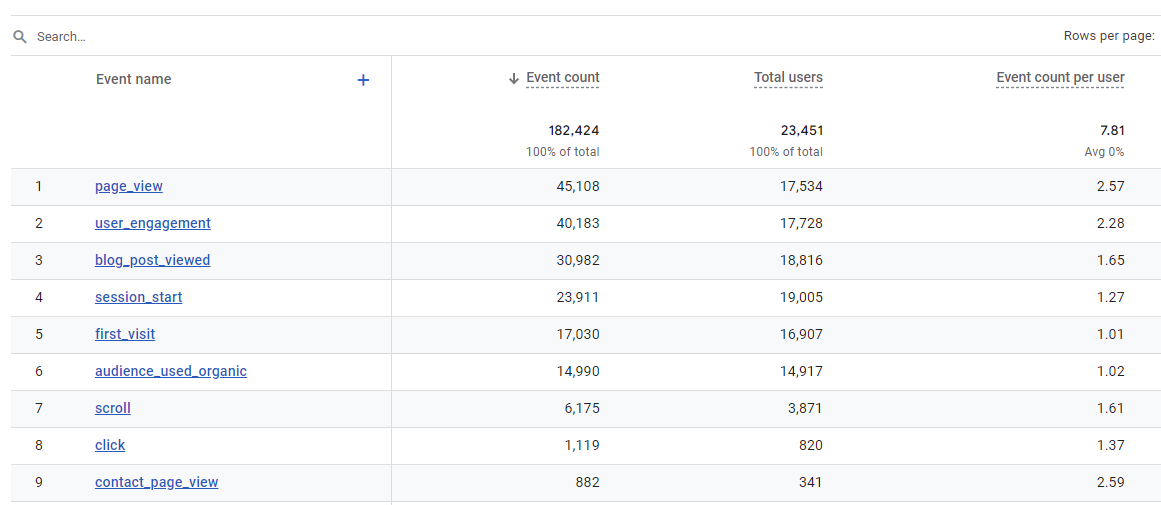
Google Analytics 4 event tracking is an invaluable feature that allows you to record interactions with elements of your website which aren’t tracked by default within GA4.
Simply by adding snippets of code to your site, it’s possible to track event interactions to understand how long users spend watching your videos or even which fields on your forms users drop off at.
There are two possible ways to track events: one is manually by editing the code on your site, and another is by using Google Tag Manager if you are less confident when it comes to code.
What can GA4 event tracking be used for?
Before we go into detail about how to set everything up. Let’s look at some of the different ways that event tracking can be used to measure visitor engagement on your site. Some of the typical uses for event tracking are:
- Tracking outbound link clicks to other websites.
- Understanding how many users clicked on mailto email addresses or click-to-call phone numbers – this can help you better understand the number of enquiries you’re getting through your site.
- Tracking PDF and other media downloads.
- Measuring interactions with video content, such as time spent watching a video.
- Tracking exactly where users drop off when filling in fields on your forms or checkout.
- Monitoring the clicks on unique elements of a page, such as the “contact us” call to action on your about page.
- Collecting data about how many users filled in and submitted a form, although we’d always recommend sending users to thank you pages whenever possible.
Event tracking allows you to count interactions that don’t necessarily involve loading another page on your website. GA4 conversions can also be set up based on your events.
What to consider before you start
To use event tracking you’ll need to have GA4 installed on your website. You can do this by adding the code to all pages on your site or by adding Google Tag Manager code to your site and then configuring GA4 tags and triggers and variables.
Before you jump into setting up event tracking, it’s important to consider the following points:
- Decide on which elements of your site you want to track, whether it’s PDF downloads or clicks on outbound links.
- Adopt a consistent and clear naming convention for the different event names you’re going to use when you’re setting up event tracking. Every name you give to an event is the only means you’ll have to understand what it does. If your naming isn’t sensible then your report won’t make a lot of sense later on.
- Decide whether you want to set up auto-event tagging or manually tag links on your site. If you have a lot of documents and page elements to track it may be worth setting up Auto Event Tagging and using Google Tag Manager Events.
How does Google Analytics event tracking work?
A snippet of custom code is added to the link code on the items you want to track on your website and when the item is clicked, the element is tracked and displayed as an event in Google Analytics.
The event tracking code consists of four elements that you can define to describe a user’s interaction on your website:
- Event Name (Required) is the name you give to the event, it’s the main thing you’ll see in your reports within GA4.
- Event Parameters (Optional) are the extra bits of data you can put into your events, e.g. the page it occurred on, or how far down the page they scrolled
The event tracking code for an event tracked link in GA4 looks like this:
gtag(‘event’, ‘<event_name>’, {
<event_parameters>
});
The code is placed after the href link text as illustrated in the example below:
<a href=”www.examplewebsite.co.uk/company_brochure.pdf” onclick=”gtag(‘event’, ‘<event_name>’, {<event_parameters>});”>
The event name and any parameter labels are replaced by the values that you decide to enter. An example of an event-tracked link with entered values is further down the page.
How to set up GA4 event tracking
Depending on the number of events you’d like to track, or the level of control you’d like to have on the tracking parameters for your events, you can setup up auto event tracking, or manually tag links on your website.
If you have lots of documents and page elements to track it’s worth using auto event tagging, which you can do using Google Tag Manager. Auto event tagging will fire on the following:
- When users click on links.
- Clicks on any type of page element.
- After a certain visit duration or at timed intervals.
- On submission of a form.
If there are other actions that you want to track then you can use Google Tag Manager to set this up.
Manually tagging links to track events
You can manually customise links on your site to add the event attributes to a link as we discussed earlier. To give you a practical example of this, below is a link that includes event code for tracking a PDF download.
The italicised text shows an example of event tracking parameters configured to record the download of a company brochure PDF document.
<a href=”www.examplewebsite.co.uk/pdf/company_brochure.pdf” onclick=”gtag(‘event’, ‘pdf_download’, {file_url:”https://www.hallaminternet.com/assets/seo_brochure_2023.pdf, file_name:”What 2023 Looks Like For SEO”});;“>Download Our Brochure</a>
Auto-event tracking options
Event tracking using Google Tag Manager
![]()
You can measure interactions on your site by setting up Google Tag Manager’s Auto-Event Tracking.
This might sound complicated but once you understand the basic principles of tags, triggers and variables it becomes quite straight forward.
Event tracking using Google Tag Manager is initiated via clicks on event triggers that can be setup on specific variables on your webpage.
Google Tag Manager events are user actions with web page elements (“DOM elements”) that are triggered by your browser and sent into the Tag Manager data layer so they can be used to set up triggers.
The steps for setting up an event in Google Tag Manager are as follows:
- Log into Google Tag Manager
- Select “Tags” from the left-hand side
- Create a new tag and select Universal Analytics as the Tag Type
- Set your GA4 Tracking ID
- Choose “Event” for the track type
- Set your Event Category, Action, Label and Values. You can use Google Tag Manager variable names such as {{click url}}
- Set your triggers as required
An example of how to set up an event within Google Tag Manager is outlined below:
Step 1 – check you have the right enabled variables selected for your event
Head over to the Variables section in Google Tag Manager and make sure that you have ticked the variables that you would like to track on your site.
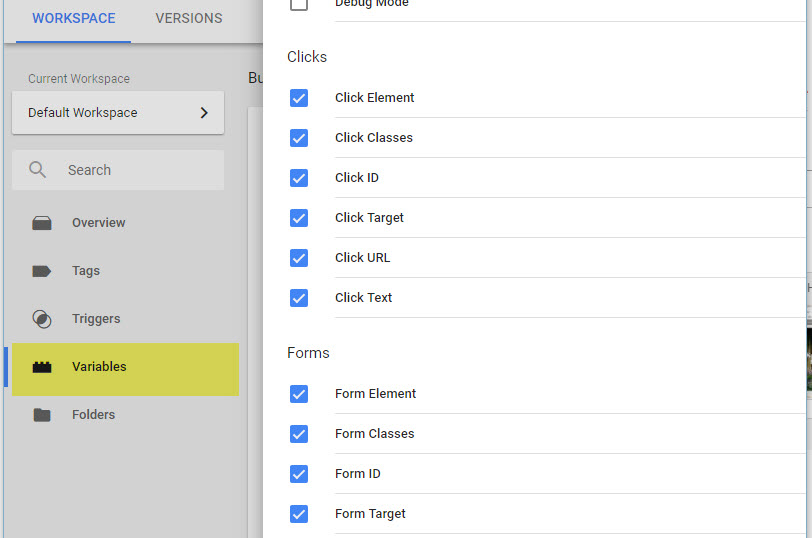
You have the option to set up your triggers based on click classes, click elements, click text and other variables.
Step 2 – create a new tag in Google Tag Manager
Create a new tag in Google Tag Manager making sure to choose the “GA4 Event” tag and not the Configuration tag. The configuration options will now include tracking parameter fields for Event Name and any Parameters you want to add as shown in the screenshot below.
As we discussed earlier, the Event Names form the basis of the tracking within GA4. The event parameters are only there if you want to do further narrowing down within GA4 or through Big Query. There are Google Tag Manager specific code variables that you can use to automatically populate fields with values. For example, the {{Click}} code will automatically pull in the web URL into the field it’s entered into.
Here, we’ve built a GTM variable to populate the search term used in our search bar.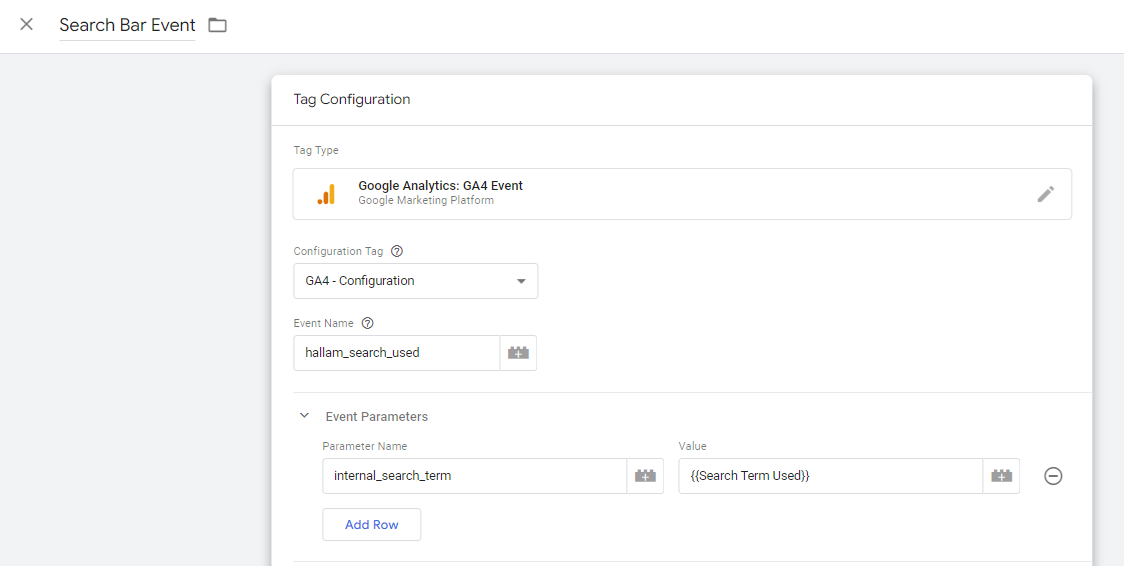
Step 3 – configure the tag
Now you want to enter values for the Event Name and any parameters.
The traditional naming convention is to use all lower-case and _’s instead of spaces. However, if you want to put capitals or spaces into your events they will work, it just often ends up looking untidy. Outside of that convention, the real key is making it something that’s identifiable at a glance. It should be immediately obvious what this event is and how it fires as you’re going to be coming back to it in 6 months time and don’t want to have to play archaeologist.
The Parameters box for your event can be populated if you want to attribute any other data to your event. You may want to specify which form was submitted or if a user was logged in or not. All the basic Parameters from a page_view event will populate automatically (e.g. page_location) so don’t feel like you need to duplicate that work.
Step 4 – select what the event tag will fire on
The next step is to select or create a trigger for the tag to fire on. You’ll need to set the fire on conditions for your tag. Below are a few examples of different types of triggers for different events on your site.
Trigger for measuring clicks on an email address link
An example of a completed trigger for an email address clicked link is below.
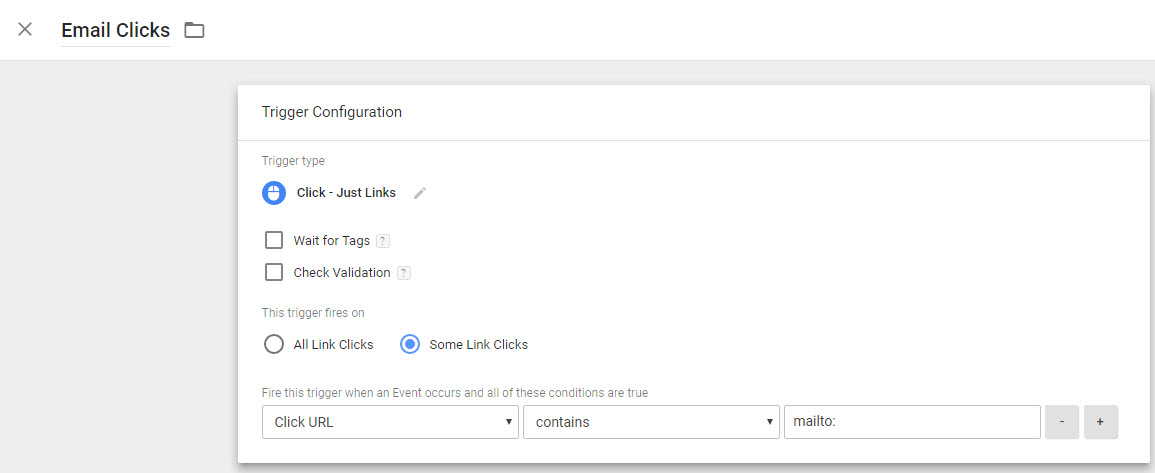
- On the choose Trigger Type screen under the Click heading choose Just Links
- Select the Some Link Clicks under this trigger fires on
- Set the variable to Click URL within the first drop-down box
- Specify that the URL ‘Contains’ in the second drop-down option
- Enter mailto: within the third field
Trigger for measuring clicks on a phone number
![]()
- On the choose Trigger Type screen under the Click heading choose Just Links
- Select the Some Link Clicks under this trigger fires on
- Set the variable to Click URL within the first drop-down box
- Specify that the URL ‘Contains’ in the second drop-down option
- Enter tel: within the third field
Trigger for measuring PDF downloads
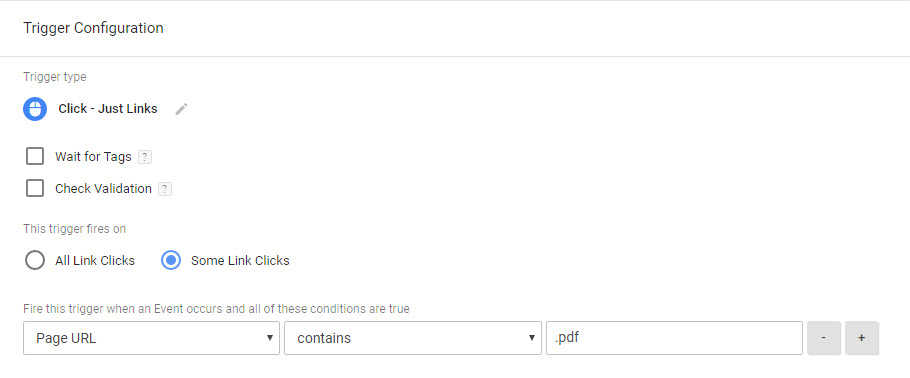
- On the choose Trigger Type screen under the Click heading choose Just Links
- Select the Some Link Clicks under this trigger fires on
- Set the variable to Click URL within the first drop-down box
- Specify that the URL ‘Contains’ in the second drop-down option
- Enter .pdf within the third field
Testing that your events work as planned
It’s a good idea to check that your events work as you intend. To view results immediately you can preview your Google Tag Manager events using the preview feature and carry out your event action to see whether the tag fires successfully. You should then follow up by going to “Debug View” within GA4 to check that it’s being received by Google Analytics as well.
Within GA4 you can also see events fired within the last 30 minutes by going to the Real-Time section and then Events section.
If you’re not in a rush or want to view historic data, go to the Behaviour > Events section of GA4.
Setting up event-based goals
Conversions can also be set up in GA4 based on your events. To do this login to your GA4 account and follow these instructions:
- Go to the property where you want to set up the goal
- Click on Admin and then go to Events
- Find your Event in the list (Note: If you’ve only just set up your event, you’ll need to give it 24 hours for the data to make it through to GA4.
- Toggle the slider that says to mark it as a conversion.
- That’s it! It’s one of the few things that’s actually easier post-GA4.
![]()
Get started
GA4 Event Tracking is a valuable addition to measuring user interactions on your website. It can be used in combination with traditional GA4 goals to measure micro or macro conversions on your site.
Using Google Tag Manager and Tag Manager events means it’s easier for you to set up and control the events you want to track, or you can still change the code on your site manually to add events if you prefer.
Useful links
- Google’s Event Tracking Guide for Universal Google Analytics.js
- Online Universal Analytics event tracking code builder
- Outbound link event tracking
Have you just learned something new?
Then join the 80,000 people who read our expert articles every month.